Device Management Service FAQs
Everything you every wanted to know about the Device Management Service and how to use it.
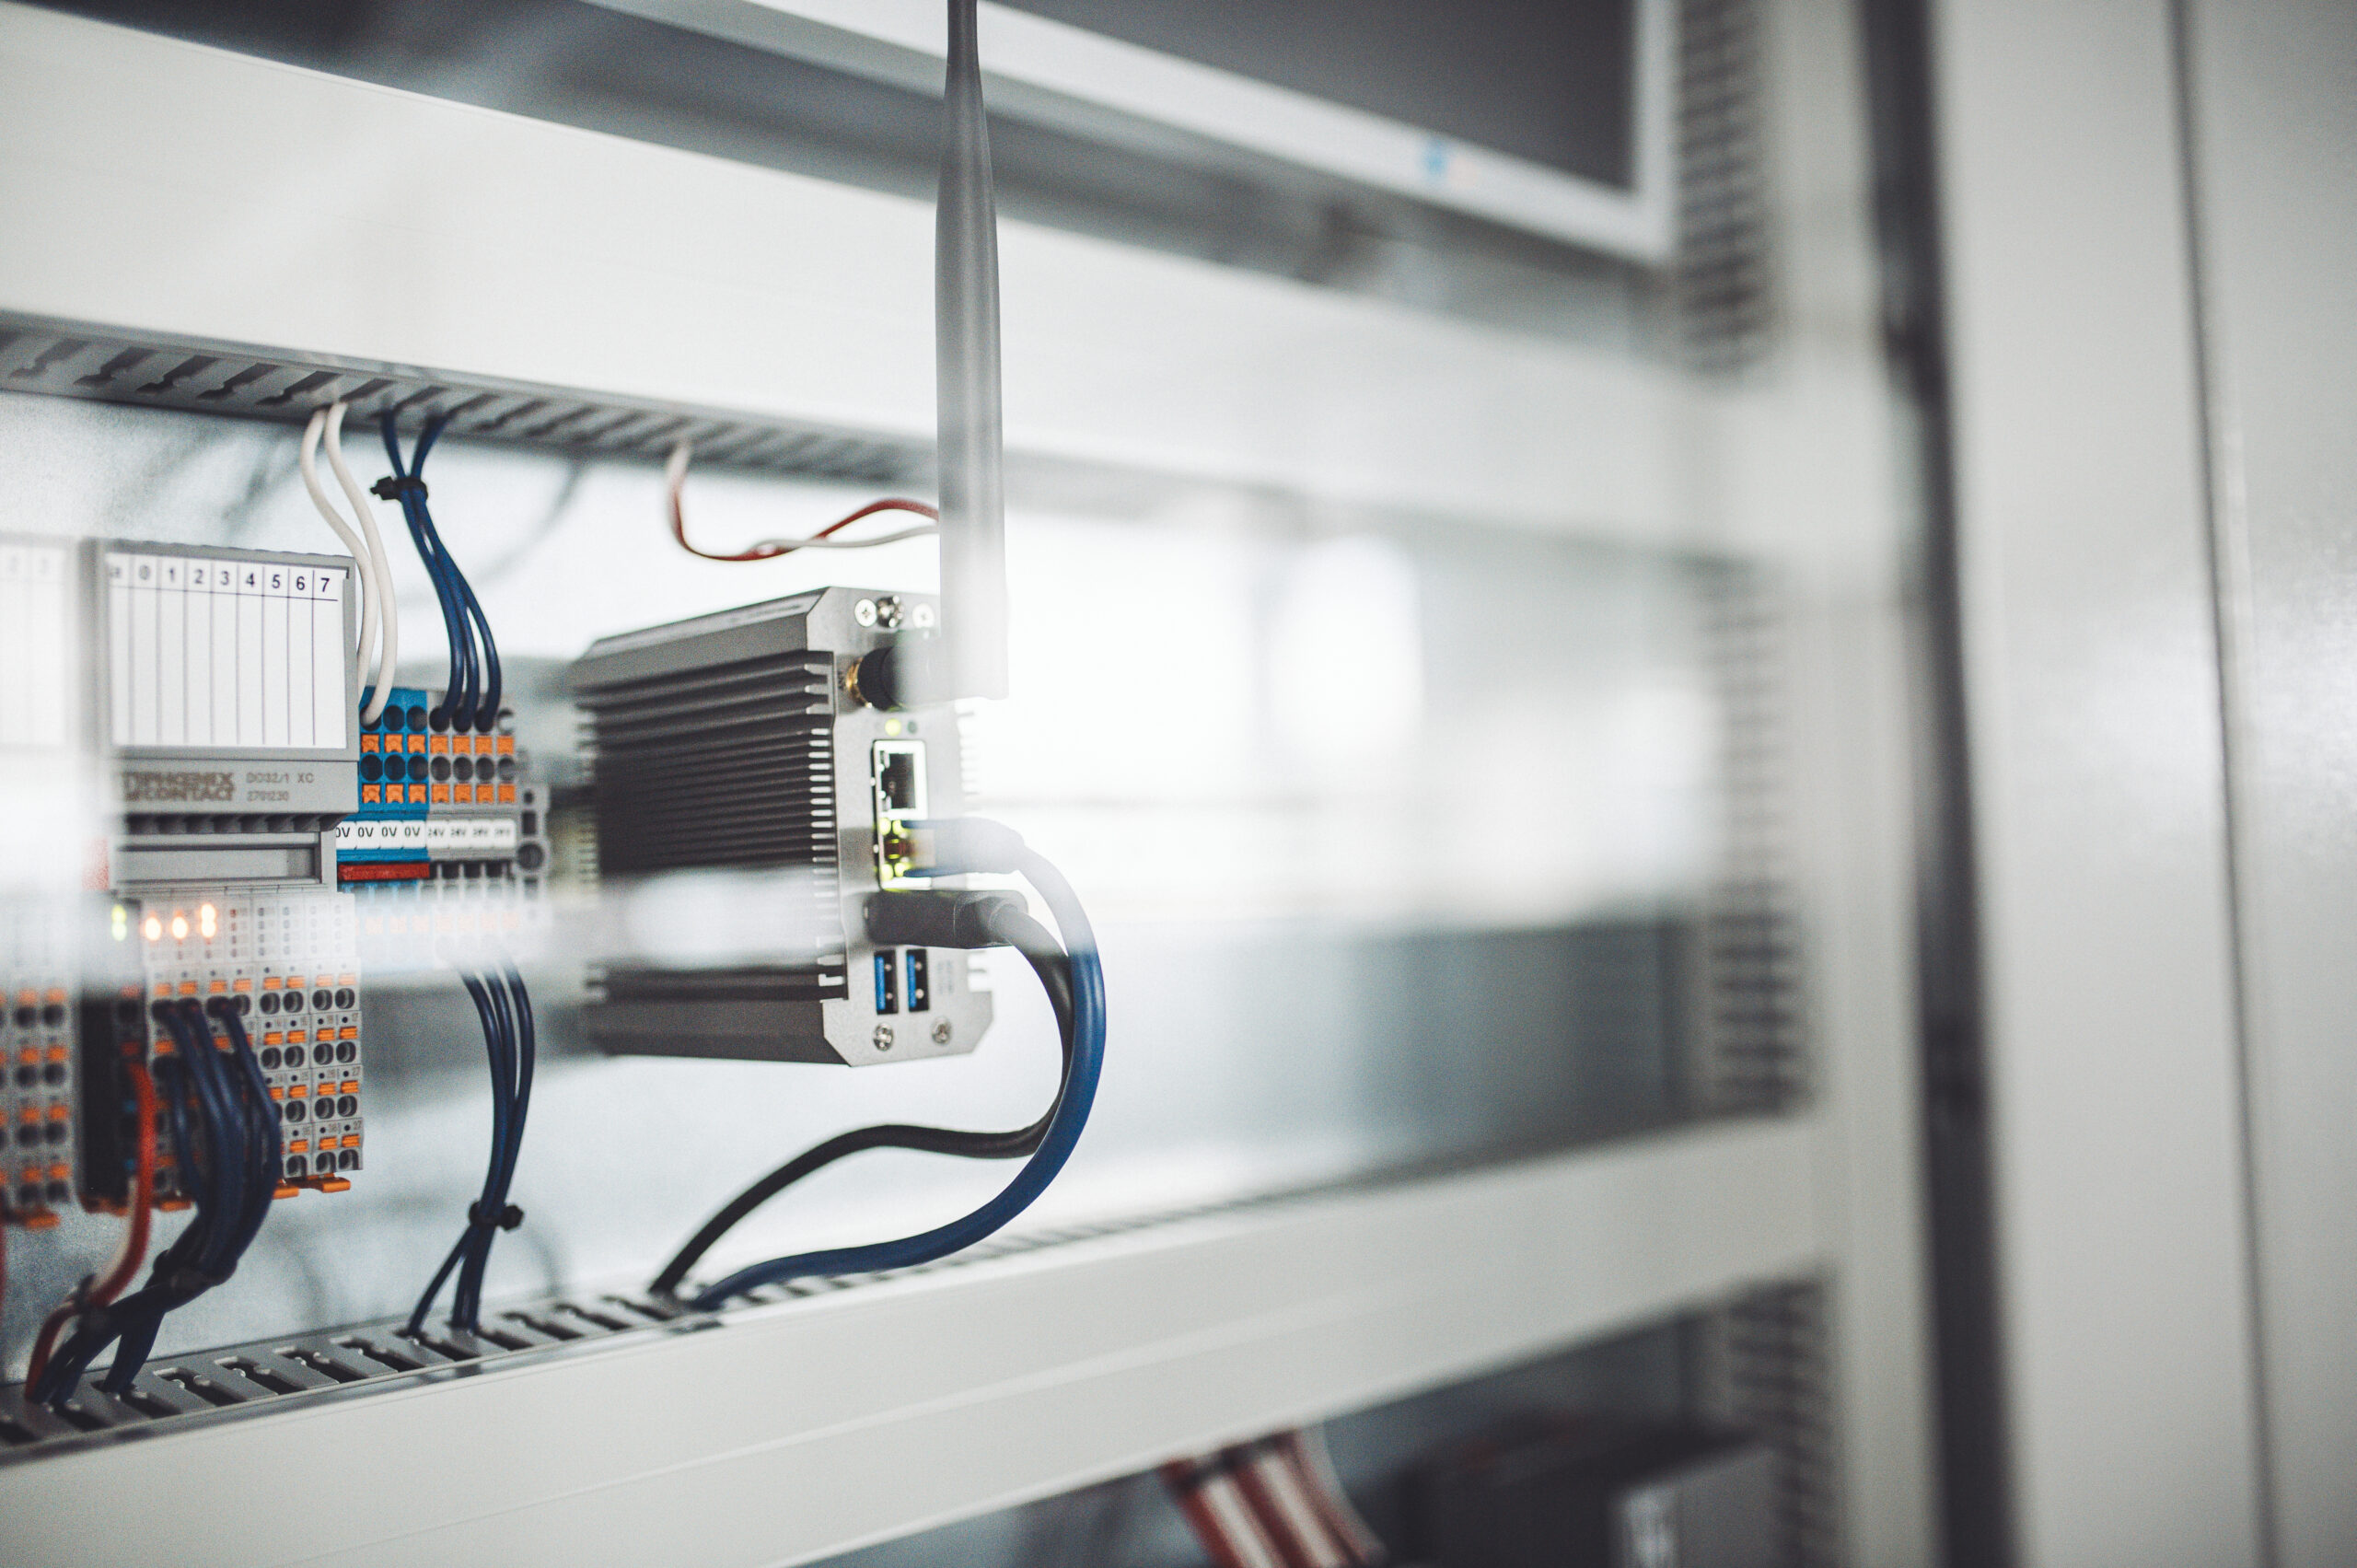
Connecting a PLCnext control unit is very simple, but there are still a few steps that need to be carried out – you can find out exactly which ones here:
You can delete a device and register it in a different organization again. Collected data is not transferred in the process, the data will be lost.
The devices use a unique client certificate to authenticate against Proficloud.io. If the device is reset to factory defaults, the certificate and the associated private key will be lost. In order for the device to download a new private key from Proficloud.io, this must first be enabled in Proficloud.io for security reasons.
To enable the private key rollout again for 10min, please follow the instructions:
- Click on the three dots at your device in the Device Management Service.

2. Click on “Reset Token” in the menu.
3. The certificate and private key rollout will now be enabled for the next 10min. Please start the connect process of you device.
When you remove a device on Proficloud.io, all the data that this device has collected will also be irretrievably deleted.
Our backups are set to consider the deleted devices in a restore. This means that even if a backup is made, no data will be restored.
Step 1 – Checking Permissions: Update not allowed
If you are starting a firmware or application update and it is cancelled in step 1 (checking for permissions), this might be the reason:
The device is missing a certificate.
Please add the certificate to your device. Here you can read how to get the permissions to update the firmware or application update for your device: How can I get the permissions to update the firmware or application of a PLCnext device through Proficloud.io?
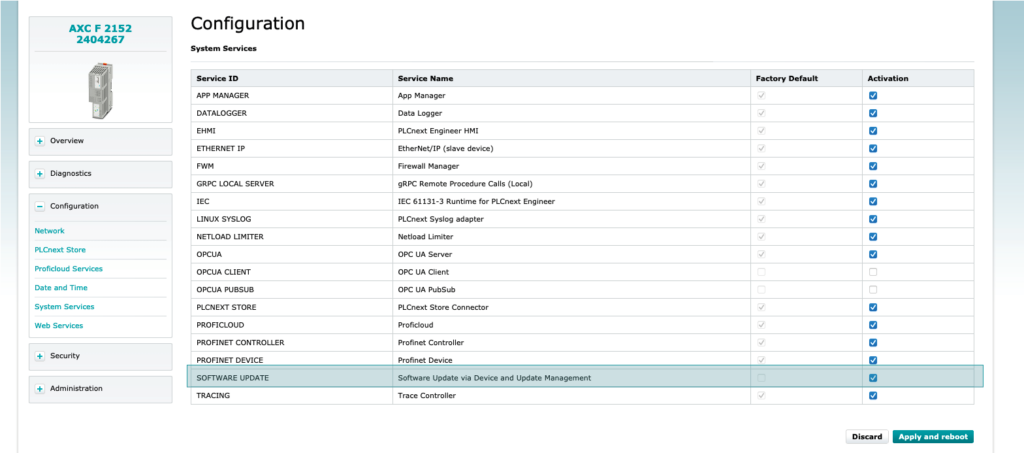
The settings in the device are missing.
It might be the case, that in the configuration of the device, the checkmark at the SOFTWARE UPDATE is missing. Please check the checkbox in this row.
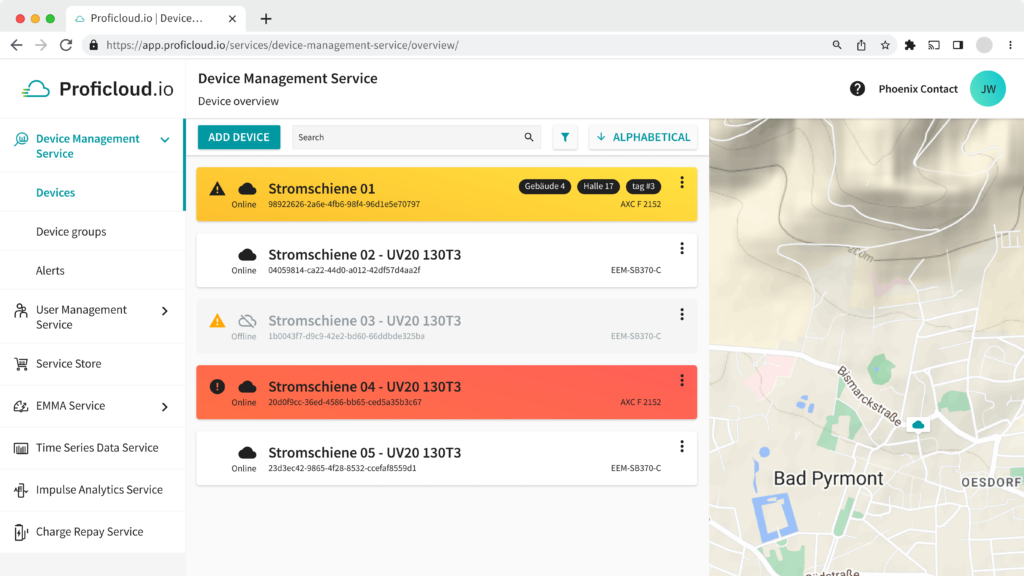
The colors of the devices in the Device Management Service follow the same signaling at a traffic light, with one small difference. With a traffic light in road traffic, the “You can drive” is just as much a signal color as the “You must not drive” or “Attention, soon the traffic light will change”.
In the Device Management Service we have replaced the green signal color with a more discreet color, because you do not need the information “Everything is OK” with the same signal effect as the Attention or Error status.
Unavailable devices are marked with their last status and a gray background.
In general, the colors should indicate at first glance which device is in which state. This means that you can see at a glance that a device with a red background may require more attention than a device with a white background.
Meanings and effects of the different colors
The colors and the statuses of the individual devices are influenced by the programs on them. So in the programming you can decide yourself which status of the device causes which health state in the Device Management Service.
For programs already configured on the controllers, please note the status information in the configuration. For this, it is best to check the operating instructions or the documentation of the project on the controllers.
Everything okay, the device is online: White

If the device is connected and no errors occur, the device will be stored in white. You can therefore use these devices normally in their functionality in other Smart Services.
There is a situation that needs your attention, the device is still working: Yellow

Yellow is the first signal level. The status is supported by the small triangle on the left side of the device. The device still seems to work here, but should be checked as soon as possible so that the device or the associated installation is not affected.
There is a situation that needs your immediate attention, the device might not be working correctly: Red

Red is a critical signal. The status of the device or connected machine is in a critical range and failures cannot be excluded. You should perform a check soon and implement countermeasures.
The device is offline, you can see the last state of the device: Grey + colored icon

The device is offline and is displayed with a gray background. The last available status when the device was still connected is shown with the icon on the left side of the device.
Now it is important to be transparent whether work is currently being done to fix the status, or the device is offline for some other reason.
- Open the Device Management Service
- Click on the three-point menu of the device whose Device Token you want to reset
- Click on [Reset Device Token]
- Confirm the security question in the dialog and start the process to reset the Device Token
With a click on [Reset Device Token] the device token is deleted and a new certification process is enabled.
After you have reset the device token, you need to start a new connection attempt with your device within 10 minutes.
- In the Device Management Service, call up the device whose firmware you want to update
- Click on [Firmware Update] in the device navigation
- Click on [Update Firmware]
As soon as the update is started, the device downloads the required data via an encrypted connection. Depending on how large the update is, this may take a while.
The update-process will now start and shows the single steps that the device will go through. The process may take a while. If you come back later to this device you will see the current state (or the report) of the firmware update in the Firmware Update navigation of the device.
- Visit https://proficloud.io and log into your account
- The first page you will see is the Device Management Service, click on “Add Device“
- Fill out the UUID (required) that can be found on your hardware
- Optionally fill in name, location and a comment
- Click on “Add Device to Proficloud.io”
You have successfully added a device to your Proficloud.io organization
- Call up the device which you want to delete in the Device Management Service
- Click on the three-point menu in the top right-hand corner of the device
- A pop-up window will open where you can now delete your device
- Click on [Delete Device] to fulfill the deletion of the device
Note that this action is final and cannot be undone. All your data will be deleted as well. The UUID of the device can now be added again.
- Call up the device in the Device Management Service with the data to be changed
- Click on the three-point menu un the top right-hand corner of the device
- Click on [Edit] to open the pop-up where you can change the entries
- A pop-up window will open where you can change the meta data of the device. The UUID of the device cannot be changed.
- Click on [Save Changes] to save the entered entries.
Device Tags
Tags can be confirmed with a comma or a tip on Enter.
Tags can be removed, with clicking on the [x] within the tag.
A device can only be added to one account on Proficloud.io.
- Delete the device in the account where you no longer need the device, this will delete the record in Proficloud
- Delete the Device Token on the device itself
Note: You can only add the device to another Proficloud account if the device no longer exists in any account and the Device Token has been reset. Also check the status of the Device Token on your device. In older firmware version it needs to be deleted by hand
If a device was connected or tried to connect, a one-time device token was requested and stored on the device. After a factory reset the token can get lost. In this case you need to reset the token in the Device Management Service.
- Open the Device Management Service
- Click on the three-point menu of the device whose Device Token you want to reset
- Click on [Reset Device Token]
- Confirm the security question in the dialog and start the process to reset the Device token
With a click on [Reset Device Token] the device token is deleted and a new certification process is enabled.
Immediately after booking a Smart Service, you have the opportunity to bind the requested units to the subscription. All you have to do is click on [Assign {Unit}] in the Order Confirmation.
Subscriptions can also be managed in the Subscription Management
Accessing the Subscription Management
You can access the Subscription Management after logging in on Proficloud.io and clicking on the Profile Icon at the top right corner. Click on [Settings] and scroll down to the Subscription Management.
Assign Metrics
In the Subscription Management, scroll to the Subscription you want to edit. Open the Subscription and click on [Assign Metrics]. In the upcoming pop up you can assign or remove the metrics of the devices you need or do not longer need.
Changes to the assignments take effect immediately after you save the edit.
Assign Devices
In the Subscription Management, scroll to the Subscription you want to edit. Open the Subscription and click on [Assign Devices]. In the upcoming pop up you can assign (or in some cases remove) the devices from the subscription.
Changes to the assignments take effect immediately after you save the edit.
After the activation of Proficloud.io Services in the WBM my PLCnext Controller stays offline. This can have several reasons.
The PLCnext Controller was not added to your Proficloud.io account
The device can only establish a connection to the Proficloud.io, if it was added to an account before.
The PLCnext Controller does not have Internet connection
To make sure that your controller is connected to the internet, please check the network configuration.
- Login to WBM of your PLCnext Controller
- Open Configuration -> Network
- Check that the IP address, Subnetmask, Default Gateway and DNS is setup correctly for your network
- To verify the internet connection, please open Configuration -> PLCnext Store and check whether the “PLCnext Store Status” says reachable
The PLCnext Controller does not have the correct time setup
The clock of the PLCnext Controller needs to be set to correct UTC time. This is required for certificate validation and correct TSD timestamping.
The PLCnext Controller has an expired or invalid token (only Firmware < 2021.6)
If the device was connected to some other account before or if the token was reset in the cloud, you need to remove the old token from your device.
- Establish a SSH connection to your PLCnext Controller (Putty is a useful tool for this)
- Enter the following command “nano /opt/plcnext/projects/Default/Services/ProfiCloudV3/ProfiCloudV3.config”
- Search for the variable “deviceToken”
- Delete the content of this variable
- Press ctrl + c, the storing dialog will pop up
- Enter y and press enter
- Now you can reset the token in the cloud by clicking on the “Reset Token” button
- After a restart of the PLCnext Controller the connection should be established
The devices use a unique client certificate to authenticate against Proficloud.io. If the device is reset to factory defaults, the certificate and the associated private key will be lost. In order for the device to download a new private key from Proficloud.io, this must first be enabled in Proficloud.io for security reasons.
To enable the private key rollout again for 10min, please follow the instructions:
- Click on the three dots at your device in the Device Management Service.
2. Click on “Reset Token” in the menu.
3. The certificate and private key rollout will now be enabled for the next 10min. Please start the connect process of you device.
With a virtual UUID, it is possible to connect third-party devices to Proficloud.io. This works with Node-RED, among others.
To make it easier for you to get started with Node-RED, we have created an e-learning: Visit E-Learning
If you do not see any or only a few logs from your device in the Device Management Service Detail view of a device, the settings on your device may be the cause.
For PLCnext control, you can set the level of logs to be transferred in the following file:
/opt/plcnext/projects/Default/Services/ProfiCloudV3/ProfiCloudV3.config
We recommend to use “INFO” as level, since then you get most information from the devices. There might another change required in another file.
/etc/plcnext/Device.log.ini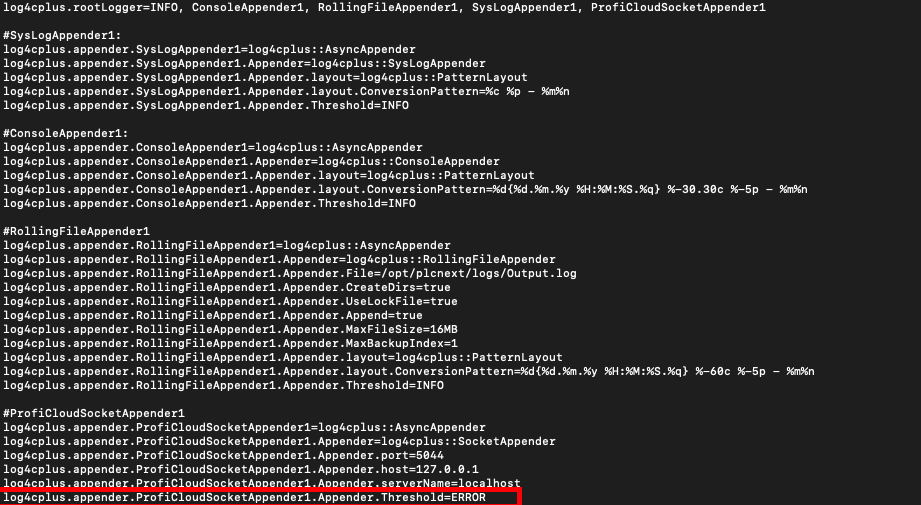
Please restart the controller after your changes.